"The Mighty Protector"
Aaaand she's gone full bonkers. Cheesy 'artistic' titles? Already? I thought we were supposed to have a few years before that hit us. Oh well, here goes.
The amalgamation of all the animals, the fusion of masterpieces, the pinnacle of human endeavor— Not as action-packed as you thought, eh? Bloody rigging. Turned out to be really hard.
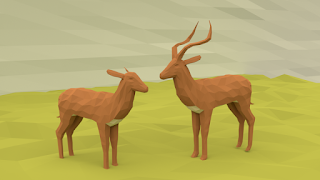
But let's start from the beginning. First, I had to model the impalas. And in this case, both the mademoiselle and the monsieur impala. Because of the, you know, antlers thingy. Luckily, it's the *only* difference between them (mister impala is still grumpy about it). It might be because this was the third animal I have created, and I've become really good at it — or impalas are easier to do. In any case, there is not much to report on the modelling phase.
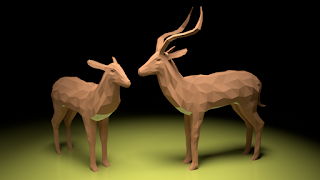
What did become troublesome, however, was rendering. You see, impalas have white bellies. With focus on the *white* part. But no matter which scene I put them into, the color of the ground blended right into their bellies. So much so that I created entirely new varieties. The common 'grasshopper' impala and its rarer counterpart, the 'Martian green-bellied'. You don't believe me? Have a look, then.
There must be some ways of limiting the color bleeding but none of those I tried worked. I could get rid of it completely, but then it looked unnatural. Especially in the second render, where they are standing on a slightly shiny surface. Color bleeding is a natural phenomenon, you just want a tiny bit of it.
Anyway, with the impalas out of the way, I started working on the most important task: bringing the scene to life. A helpful side note at this point. You might want to set aside more than two days for it. Looks simple when professionals do it, but believe me, it is not.
Before you can pose the creature, you have to create its skeleton. Or armature, as Blender prefers to call it. Each bone is a separate object and they are linked by joints. This is where the body will be able to bend. You don't have to create the full skeleton (even though you should if you want to achieve the best results). You can set up just the main ones for the body, limbs, tails, ears, trunks... whatever bits the animal happens to have. And yes, in the Blenderworld elephants have bones in their trunks.
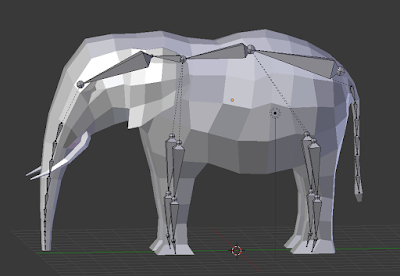
The completed armature might look something like this:
As you can see, there are many bones in the trunk. That's because I wanted it to be really flexible. Also, the dotted lines you see in the picture connect the children and parent bones. If the parent bone moves, the children have to follow. Blender also has a neat feature that lets you speed up the process of naming the bones. Let's say you create bones in the front left leg. You can name them something like "front_leg_top" or "front_leg_middle". If you also append ".l" to the name, later, when you duplicate the bones for the right leg, you can choose to flip the names and Blender will automatically rename them to "front_leg_top.r". This will save you some time — and make no mistake, you are going to need it.
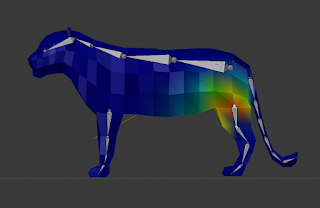
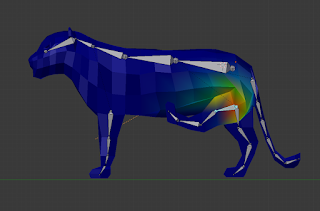
The next step is weight painting. To put it simply, it tells Blender how much the surrounding area should move when you rotate a bone. The weight is a number between 0 and 1, and is represented by colors: 0 is dark blue, 0.5 is green, and 1 is sharp red. The following images should give you a better idea of what it looks like.
When you parent the mesh to the armature, you get the option to set up the weights automatically. This works well — to some extent. You should still go to the weight painting mode and tidy up everything by hand. And preferably *before* you pose the creature. That way you might be able to avoid my mistakes, where I moved a hind leg, for instance, and it squashed the lioness's face and tore her chest open so much that Ridley Scott thought it was a bit distasteful.
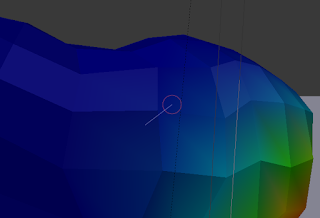
But if you think that weight painting is easy or even remotely intuitive, then bless you, my friend, you couldn't be more wrong. I am slightly ashamed to admit that in some cases it might have happened that I found myself using that kind of language that causes a fainting spree among ladies. And blushing. Probably not in that order. Also, shouting at the screen is not as helpful as it sounds. But to explain my frustration, imagine that you have a cursor that has a circle around it, and when you hold the left mouse button, a tiny line, with a mind of its own, expands from it, and your task is to drag it over a vertex you wouldn't be able to find if your life depended on it. Something like this:And then you find the vertex and it changes colour, but since you had entered the wrong weight number, the area is now red instead of blue. So you fix it, and, happy you didn't waste those ten minutes of your life after all, you turn the mesh around and you realize that you had the see-through option on the whole time so you also painted the vertices on the other side, and now you are ready to murderize someone. No? Just me? Oh, all right, you bunch of... competent blenderers. Just you wait. I'll get better at it and then you'll be really sorry. And old and gray but that's not the point.
Next time I'm goint to do— Huh, what am I going to do next time? Er... it's a surprise! Yes, that's totally what I'm going to do, a surprise project.


Comments
Post a Comment