Pokemon 01: Bulbasaur
After a lot of thinking, I decided to give sculpting a go. It was not an easy decision because it is something I've never done before so I'm naturally scared stiff. Nevertheless, I started looking for suitable subject matter.
My first steps led to various kinds of monster encyclopedias (especially Greek mythical creatures are well documented) and it wasn't long before I was buried in talons, scales, horns and other kinds of nasty appendices. But when it came to judging how well I would be able to sculpt the particular monstrosity, it went something like this: "Difficult, difficult, very difficult... hmm, this one here... craaazy difficult..."
Right. Well then. Perhaps something less hairy, scaly and gooey for start, thank you very much. What could we... Oh, I know! What about Pokémon? They are cute, not that complicated when it comes to shape and body covering... Let's do that, then. And let's start with—bulbasaur!
I know, I know, no need to shout, he is not on everyone's top 10 list. Or top 500 for that matter... But hear me out! His shape is a happy medium between simple and interesting, his colour palette is not too complex either—mind you, I'll have do some texture painting as well—in short, he is an ideal first model. So I'm going to ignore your feeble protests and carry on sculpting him.
***
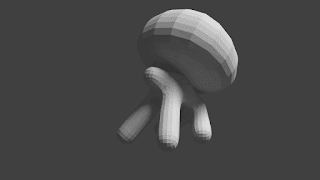
I'm going to use a neat trick for creating a base mesh. Start with the default cube, press a magical keyboard shortcut and shazam! The cube is transformed to a single vertex. Now, what do we do with a single vertex? Well, we marry it to the skin modifier, of course. Allows us to do all sorts of crazy stuff but we'll limit ourselves to extruding the body, legs and head of the unfortunate creature.
And I've just realized that I started to use the royal "we" to talk about myself. Always a good sign. (Not.)
***
I think I might have a new nemesis: the Terrifying Skin Modifier. When it works, it's great. When it doesn't—and that's most of the time—you feel like throwing the monitor out of the window*. Well, that didn't happen, as you can see, but there were a few times when I was seriously considering getting rid of the skin modifier and extruding a cube instead. However, I persevered, and mere four attempts later I got my base mesh.
But if you think that was the end of it, you are gravely mistaken, my friends. All giddy to finally start some proper work, I made a few tentative brush strokes, and... the mesh opened up like a ripe plum. I thought, no worries, I can fix this, just put some clay on it and it will be fine. It wasn't. I knew immediately that it was not going to work but I clung to it desperately because I dreaded going back to the skin modifier.
Attempt number five. I realized my mistake and I tried to avoid overlapping geometry (because that's what the skin modifier will do if you let it out of your sight for five seconds). Overlapping geometry means that when you apply the modifier it will create a mesh that is sort of folded into itself—and can be unfolded all too easily. But I was sure that I could avoid it this time. Yeah, you know where I'm going with this, don't you?
Attempt number six. Also known as 'The Attempt' because it gave me the coveted base mesh you can see above. I might be a bit hoarse and teary right now but that doesn't matter. I got there. Let's just hope that the sculpting part goes more smoothly. I'm sure my neighbours would appreciate that too.
***
Hmm. I'm not really sure how to report progress on this one. With previous projects it was easy. "I created this, see, and now I'm off creating that." Simple. But with sculpting? I can't very well go and say, "Oh and then I took this brush and smoothed the leg a bit, and— oh noo, that was too much, let's inflate it a bit— goddammit, that was a wrong brush, how do I...? Right, now I should infl— noo, what are you doing, don't press Shift now, you don't want to smooth it, you daft— Aaand now it's all ruined." Right, not like this. It would shine among the after-match soccer interviews but it wouldn't do so well in the artistic community, I think. I'll have to keep you in the dark until I finish the sculpture, I'm afraid. But I'll put the in-between stages into the final gif, I promise.
***
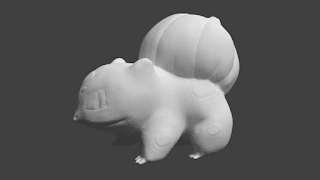
It is now two days later and I have finished sculpting. If you've read this far you must be eager to see the result. Here you go, then:
I'm quite happy with how the bulb turned out, but the eyes are taken right out of a creepyrarium. I had two reference images: a side view and a front view. But no matter how hard I tried to position the eyes, they never fit both images at the same time. I couldn't figure out what was wrong until I realized that the side image had its eye drawn in Egyptian style. You know those wall paintings where people's heads are shown from profile but their eyes are seen from the front view? Early Picassos, tragically misunderstood in our time.
But since I couldn't find any correct side-view images, I had to improvise and you see how it went. Also, the nose looks like a beak and I didn't get the ears right. But there might be hope for me yet. Maybe the texture will improve it dramatically. (You can sense my unbounded optimism here, can't you?)
***
Another day has gone by and I'm done with the texture painting. And it was both a gratifying and nerve-racking experience. You see, sculpting a smooth object makes the mesh incredibly dense. I'm pretty sure there are more vertices in poor old bulbasaur than there are in my heavily forested Discworld scenes. Such a mesh is a bad news if you need to UV unwrap it—which you do if you want to paint on it. As far as I know, skilled Blenderers solve this issue by recreating an optimized mesh through retopology. It's a topic I have in my learning queue for the next week, which means that this week the dense bulbasaur will have to do.I was extremely lucky that the smart UV unwrapping worked for me without major issues. The computer had to munch on it for unusually long time but it was still a lot faster than if I tried to unwrap it manually. There was one undesirable side-effect, however. Some individual faces got grouped up with incorrect body parts. It didn't become apparent until I used multiple colours, though. Then I noticed this fine spray of paint in places where it shouldn't be but I attributed it to my lack of skill with handling the paint. Only when I was working on the eyes, I noticed red faces appearing on bulbasaur's bum, and I put it all together. Unfortunately there wasn't much I could do. I blended in the small areas and I cheated a bit with the claws by giving them a separate material.
Now I just need to create a simple scene and I should be done. Since bulbasaur is predominantly a grass type, it shouldn't be too difficult to make a plane with a few weeds on it.
***
And I'm officially done. Creating the scene was refreshingly easy to do so I decided to torture myself some more and I reworked the contours on the bulb. I got into crazy difficulties when saving the texture and the project and bundling it all together but I'm not going to go through it because I'm not entirely sure what happened. Instead, I'll show you bulbasaur from a different angle (since I spent so much time in trying to make that happen).I have to say, however, that despite all the pain and trouble I got into this week, I enjoyed myself very much. I can't decide which mode of work I like better, because they are very different, but I got really absorbed with what I was doing when sculpting. Three hours flew past without me even noticing. I think I'll stick to this for a bit longer. I already have a few Pokémon in mind that I would like to create but if you have favourites feel free to post your suggestions below. Oh, and here is the gif, as promised.
(* Disclaimer: No monitors were harmed in the making of this scene.)


Thanks you, this is good model for my reference
ReplyDelete