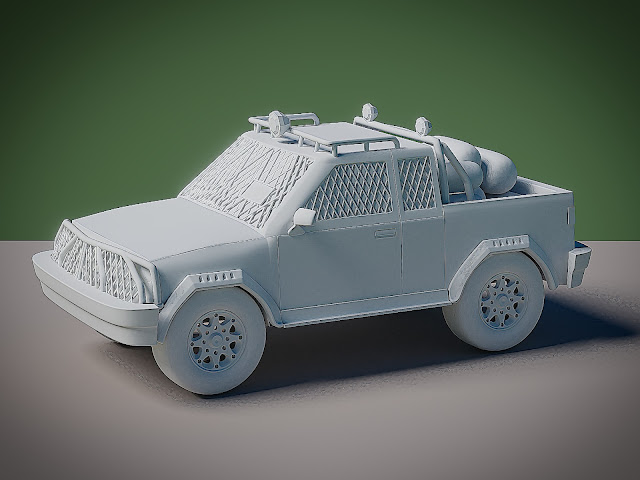
Pre-post-apocalyptic truck
I decided to do something different this week.

Opening statements like these always almost indicate that what you are about to see is sub-par at best, but the author is trying to sell its shortcomings as positive features. You should get a similar flashing red light warning if something is presented to you as "interesting".
Do you like my new haircut?" ---Ehh... yeah, it's very... interesting".
I made a very interesting post-apocalyptic vehicle this week.
(Are you still there? Oh, right. Never mind, then.)
(Are you still there? Oh, right. Never mind, then.)
It hasn't seen any apocalypse yet. Or materials. But I've come up with a funny title, which definitely makes up for that (regarding the use of pseudo-humorous texts, see paragraph two).
What happened is this. I followed another tutorial on CG Cookie, one that is also included in the June class syllabus. The course is presented by Jonathan Williamson, so I was looking forward to brushing up on my topology skills (Jonathan is well-known in the Blender community as a "proper topology wizard"). Unfortunately, there were a few issues that dampened my enthusiasm. One, it seems to be an older course and it doesn't showcase polished topology very much, and two, lot of the important parts are done in time lapses, which makes it almost impossible to follow along.
I soon got to the point where the separated truck pieces started to fall apart. With every subsequent adjustment, more things would refuse to fit together. I had to spend a few teeth-grinding hours to put them back on track—and even now the major shapes look a bit wonky.
As to the lack of materials, I decided against texturing this time, because the UV unwrapping would be a nightmare. Especially the bars. They are made of curves that would have to be converted to meshes. That is not the end of the world, but adding seams to them might be. Luckily, I was saved by an add-on.
You don't hear that sentence very often, but it is true. Thanks to this Remington Graphics video I discovered a wonderful add-on called Easy FX. It adds a new tab to the UV image editor and lets you easily apply all kinds of effects to a render. Want to use a vignette? Here, tick this checkbox. Interested in colour tweaking? Have these three value sliders. Depth of field? Blur? Glow? You name it, we have it. Want to go a bit crazy? Make a truck with ridiculously high Sharpen value and Saturation going through the roof. Now you've done it.
The add-on has another neat feature:
It can split the render into "before" and "after" effects sections. The split is a percent value and it can be animated. At least in theory, because I wasn't able to make it work. I can insert the key frames all right, but once I start the animation, the post-processing state of the last key frame is applied to all rendered frames. But how did I get the animation, then? Well... manually, my friends. Manually.
At least I only had to render the full-size image once. Then it was just set the split value, wait a few seconds for the editor to refresh, F3 to save image, increase file name by 1, rinse and repeat. You start to question your sanity at frame 40, you fall into a coma at frame 60, and by the time the frames are treated you are sure you never want to see another truck in your life. (I exaggerate, as usual. But it does get tedious and there must be an easier way of doing that. Maybe I'll ask on Blender Stack Exchange.)
So that closes my "first modelled car" week. Could it have gone better? Yup, definitely. Did I enjoy modelling it? Not particularly. But the life of a 3D artist is not always an easy one and this should prepare me for times when I'm not able to choose what I want to work on. Persistence and deep breaths, that should do it. Next week I'm going to tackle the motorcycle (may it go better than this one) and then it's the class beginning. If I make it through I'll reward myself with an Animation July, I think. See you next week!


Comments
Post a Comment