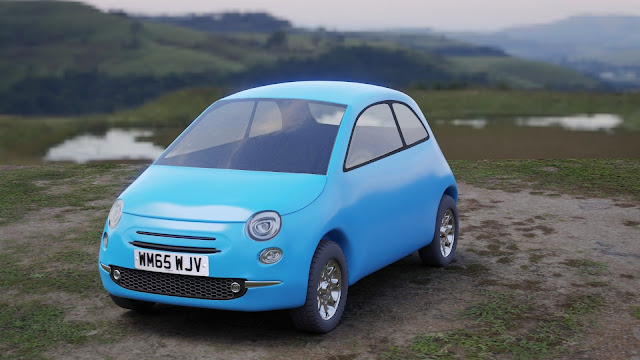
Fiat 500: Part 1
I managed to keep it secret so far, but I'll have to tell you now: I'm going to model [drums rolling] Fiat 500! Uiiiiiii! Wait, what? No one cheering? Oh, alright then. I'm still going to do it.
And do you know why? Because it's a cute little car that proved invaluable during my holiday in Scotland. Can you picture the lush Scottish countryside with charming houses, grazing sheep and narrow roads winding though it all almost as if they didn't want to spoil the view? Well try to pass someone on a road like that. It usually ends up with one car waiting in a ditch, while the other driver is trying to squeeze a ton of metal through ten centimetres of asphalt. Such an experience can take a toll on people's nerves. But it also has a bright side: everyone waves at you. And by everyone I mean everyone. I'm not sure whether they were happy to see a human face, or they really wanted to survive the ditch business, but before the day ended we were waving back at them with the ease and confidence of the locals.
Now, if you excuse my rambling back there, let's move on to the car, shall we? I don't think I'm going to surprise anyone when I say that cars are bloody hard to model. The little fella you saw above is the third iteration of my hopeless struggle with vertices. I started with rough block out. Because that's what you are supposed to do. Rough block out turned to just rough before you could say stupid-curves-why-didn't-I-pick-a-truck-instead. The worst part is the bit near the hood where the windows meet the side of the car (as you can see, I have all the best words when it comes to cars). That bit is just impossible to get right. And to make matters worse, you kinda need to have a pole there. Which means pinching, no matter what. *Sigh*.
So I pushed and pulled and extruded and deleted, until I got a basic shape that I was somewhat happy with. Then came the "window phase". I've lost track how many times I separated, polished and deleted the windows, but my rough estimate is one-too-many times. I think that right now, I only have the windshield separate; the side and back windows can go screw themselves, as far as I'm concerned (or whatever it is windows do when you are not looking).
I think I should check myself not to make this post super-long, so I'll skip a couple more colourful afternoons spent on moving a curve here and fixing a dent there, and I'll quickly sum up what I haven't done. The Fiat logo, an indentation on the hood, the wheels (these are borrowed from the post-apocalyptic truck), oh, and then such minor details as doors and the back of the car. Easy.
As far as the materials go, these are temporary. I hope. The same applies to the background—I managed to find a ground texture that fitted quite nicely with the HDR, but I'd still like to do something better for my final render. Speaking of which, I should probably show you the picture that I'm trying to recreate, right? Well, here it is:
 |
| Caution: NOT a render (I wish) |
And on that bombshell, it's time to end this week's post. Part 2 should be all about finishing the exterior with proper details and materials. And if I have some time left I might start cracking with the interior (I'd love to be optimistic enough to believe that one week would be enough for that, but I'm not, so I'd better start as soon as possible). See you next week!


Comments
Post a Comment