Library of the Unseen University
Alright, the next installment in my Discworld series is the Library of the Unseen University. I originally thought I'd use the first few scenes to gradually zoom in on the Disc. First I'd create the Great A'Tuin, then Ankh-Morpork, followed by the University, and finally the Library. But you know how it is with the inspiration particles. "So the city needs to be about this bi—" *boom* —and I'm working on the Library.

I also made a few adjustments to my creative processTM. For one, I'm writing this post as I work on the scene (instead of trying to remember what the heck I was doing a few days ago) which means that I'm as curious as you are about how it is going to turn out. This arrangement should also help me capture the in-progress images as the blunders happen. Because recreating them afterwards is a) not always possible and b) brings up memories I'd prefer to keep securely locked in the "Repressed—Do not examine—Fragile" box.
Anyway, the first thing I need to get right is the camera. Not what you were expecting, huh? But it's a good practice in general—and it is especially important in this scene. I have quickly discovered that when I position the camera as I normally do, the perspective looks... funky. I'm not sure if it is just me imagining things but the bookshelves look like they were built by a carpenter who's had more than a few.
|
|


Hmm. But now that I look at them... The first one is better, isn't it? *Sigh* Ok, I'll keep the first one for now.
The next task is to make books. Lots and lots of them. I'm going to create several different ones, combine them into a number of groups and then use those groups in different places in the bookshelves to give it an illusion of randomness. Let's see how this goes, shall we?
One of the tools that could come in handy is the array modifier. I've created the first book (just a simple shaped cube to keep the polygons low), added the modifier, set it to 10 copies, applied, and voilà! nice group of books ready to be shaped and coloured. But the problem is that in Object mode they are still a single mesh. Which is not exactly what I need. Hello Shift+D, my old friend.
 | |
| Books of 5 colours and 5 binding types |
***
Ok, this took some reworking because I'm apparently not able to think ahead. Duplication exercise 1: create a book, don't rename it. Have all copies called "Cube.00X". Exercise 2: create a book, rename it, don't apply base material. Select material for each copy manually. Exercise 3: create a book, rename it, apply material, create ornamental binding. Forget that you want different bindings, scrap binding. Exercise 4: create five different bindings. Realize how tiresome it is, delete remaining books, copy and adjust again. How much simpler my life would be if I used my brain more often.Anyway. With the books created, I set up three book piles and combined them into book shelves. There are six of those in total. It might not sound like it but it was a lot of book shuffling. Luckily, I made a new friend: Shift+G, select all children (of the empty to which they are parented). It made the whole deal a bit more manageable.
|
|


But even though I found a way of distributing the books, it is far from ideal. From what I've seen so far, I think the best course of action would be to model the single shelves and then bake the materials into a number of maps, which would be applied to low poly versions of the shelves. Well low-er poly versions. As for now, I have about 40,000 books in the scene. Even with low poly count on each one, it is still a lot of polygons. If I had my doubts about the last scene being low poly or not, now it is a crystal clear "or not". I'll really have to figure out how to do the baking thing.
***
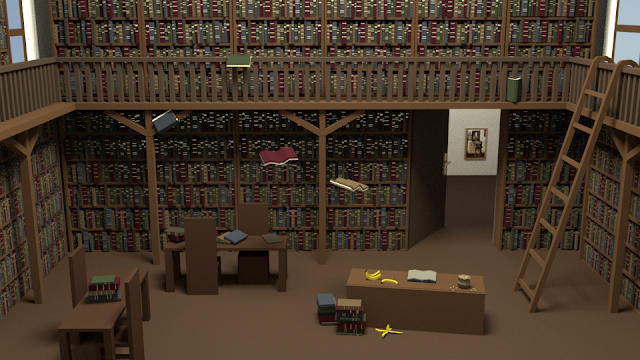
Meanwhile, work on the scene progresses reasonably well. I got so caught up in modelling that I forgot to take pictures and I'll only have text description for you. This is what the scene looks like right now:

As you can see, I've created the middle intersection with railings, added a few tables and chairs, and the librarian's desk. I've also started adding clutter but it's more difficult than I expected. I have already zoomed in a bit and got rid of one column of bookshelves length-wise and one column on each side. And it still feels empty and... too clean. The Library of the Unseen University should be a wild and crazy place. This place looks better than most libraries. On good days.
I have a few ideas for what to do with the librarian's desk, and I'm also going to add one of those ladders you can find in big libraries. And then I'll have to think really hard about what to add next. Definitely not a globe. I saw that in one of the reference images I found, and it didn't strike me as odd for the longest time. But then it dawned on me. A globe... on Discworld? Hmm. Nope. (What do they use then? Just maps?).
I tried moving the window in place of the second bookshelf from the left. That worked a bit better but the light was attracting too much attention. So I placed the windows on the sides which had the added benefit of getting rid of another bookshelf. Then I remembered I saw a tutorial about using area lamps as portals to guide the light from HDR image inside a room. So that's what I'm going to do. Even though I'll do that at the end (because I'm expecting a hit in performance), it didn't stop me from getting the scene ready.

This seems like a bit of an overkill, I know, but I would like to get a nice lighting set up. What I *will* get instead is a lot of noise, that much is almost certain, but maybe I can work my way around it somehow? Pretty please?
Let's cross that bridge when we get to it. Now it's time for bananas and ladders. No, it's not a terrible board game (at least not yet), it's my Clutter project. I've added a ladder into the scene and it suddenly started looking much better. I also spread bananas over the Librarian's desk and now I'm going to add a banana peel, an open book and a sack of peanuts. That should keep him occupied.

You know, for a while I was considering rigging the damn thing. But it would hardly make it any easier and I already spent so much time on it that I just wanted to finish it as soon as possible.
Then there was the question of what to do with the empty doorway. I created two paintings, placed them, and... didn't like them. It looked like a doorway into your soul. So I added doors (funny how you think you know what a door handle looks like until you try to model it), I removed one of the paintings and dialed down the lighting. The result is—hopefully—a more balanced image.
And then I finally added the HDR image, fumbled with it for ages before I found an angle that showed blue sky for both windows, oh, and yeah, I had to add the windows. I wasn't sure about the material. Glass wasn't working well, for some reason, so I ended up with pure refraction. Probably not the best way to do it, but oh well. Maybe next time.
Speaking about next time, I think I might do Wyrmberg. I already have a sketch of sorts. And it would be nice to create an outdoor scene for a change. Which is what I wanted to do in the first place. (I'm looking at you, inspiration particles.) But since the little buggers are highly unpredictable, don't attach yourselves too much to the idea of Wyrmberg. It might end up being anything.
***
But before we can get to the "cluttering the scene" phase let's now have... an intermezzo! I started thinking about lighting. As you can see in the picture above, I left gaps between the bookshelves for a door and a window. Only... if there is a window in the gallery, where does the door lead to? It could go outside but then the Librarian's desk would have to face it, and I don't want to do that. The layout of the room will need to change. But how?I tried moving the window in place of the second bookshelf from the left. That worked a bit better but the light was attracting too much attention. So I placed the windows on the sides which had the added benefit of getting rid of another bookshelf. Then I remembered I saw a tutorial about using area lamps as portals to guide the light from HDR image inside a room. So that's what I'm going to do. Even though I'll do that at the end (because I'm expecting a hit in performance), it didn't stop me from getting the scene ready.

This seems like a bit of an overkill, I know, but I would like to get a nice lighting set up. What I *will* get instead is a lot of noise, that much is almost certain, but maybe I can work my way around it somehow? Pretty please?
Let's cross that bridge when we get to it. Now it's time for bananas and ladders. No, it's not a terrible board game (at least not yet), it's my Clutter project. I've added a ladder into the scene and it suddenly started looking much better. I also spread bananas over the Librarian's desk and now I'm going to add a banana peel, an open book and a sack of peanuts. That should keep him occupied.
***
Ghhhhh, I hate bananas! Their peels, anyway. Try to imagine the worst possible way someone could go about modelling a banana peel—and you'll almost get what I just did. Separating, merging, separating again... And such a silly small thing. I'll show it to you here, in detail, since you won't see much of it in the actual scene.
You know, for a while I was considering rigging the damn thing. But it would hardly make it any easier and I already spent so much time on it that I just wanted to finish it as soon as possible.
***
Ok, another—major—fast-forward. So major, in fact, that I've just finished rendering the final image. The last two hours were... intense. I created a bag of peanuts and an open book. Then, in a flash of inspiration, I duplicated the open book and arranged it around the scene to increase the craziness level. At this point I did create a simple rig for the books, only it wasn't behaving as well as I intended so I deleted it and positioned all the books by hand. Then there was the question of what to do with the empty doorway. I created two paintings, placed them, and... didn't like them. It looked like a doorway into your soul. So I added doors (funny how you think you know what a door handle looks like until you try to model it), I removed one of the paintings and dialed down the lighting. The result is—hopefully—a more balanced image.
And then I finally added the HDR image, fumbled with it for ages before I found an angle that showed blue sky for both windows, oh, and yeah, I had to add the windows. I wasn't sure about the material. Glass wasn't working well, for some reason, so I ended up with pure refraction. Probably not the best way to do it, but oh well. Maybe next time.
Speaking about next time, I think I might do Wyrmberg. I already have a sketch of sorts. And it would be nice to create an outdoor scene for a change. Which is what I wanted to do in the first place. (I'm looking at you, inspiration particles.) But since the little buggers are highly unpredictable, don't attach yourselves too much to the idea of Wyrmberg. It might end up being anything.


Comments
Post a Comment