Cosplayer's jewellery box
Ta-daa! And now you know what's inside the box. That's all for this week, see you next time!


Nah, just kidding. It wouldn't be a proper blog post without me complaining about the stuff I screwed up that week, would it? Where to start this time...
Let's begin with the things that went well. That should give us a nice (and short) introduction. I'm quite pleased that I managed to cram everything I know in Blender and Substance Painter into a single project. Mesh modelling, sculpting, curves, texturing procedurally and by hand-painting... It has it all. And the subject matter is especially close to my heart. So much so that it's surprising it took me this long to make a project out of it.
The individual pieces were a lot of fun to work on. Each of them needed a slightly different approach and I enjoyed figuring it all out. Interestingly, the ones I was afraid to make because of their complexity turned out quite nicely. While others... let's say that things were started and deleted more than once. On one occasion, I think it was when I was working on Vilya, I went through the whole Blender-to-Substance Painter ritual, only to find in the Painter itself that the damn thing had a completely wrong shape. Actually, that's not quite true. It happened twice (with Narya as well). Some people just can't take the hint...
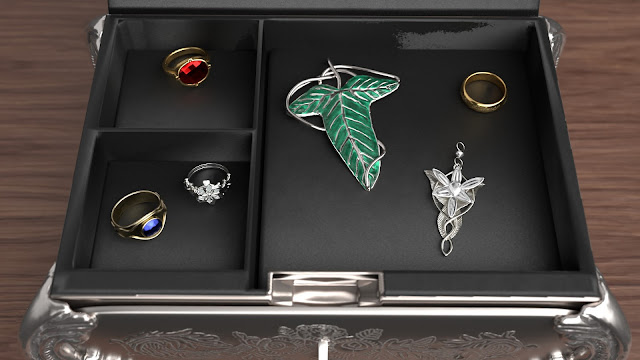
(Vil- what? And what the hell is Narnia? Did I miss something?) No, dear confused reader, you didn't miss anything (other than a fantasy masterpiece). The jewels have unique names because of... reasons, and I really should produce a nice diagram before I confuse you even more. So, here it is:

See? It's not that bad. The three rings at the bottom are those that were given to noble Elvish lords and as a nice side-effect of this week's project I'm now finally able to tell them apart. I'm also able to write in the Black Speech, so I've got that going for me... I'm sure it will come in handy. Any time now...
Ehm. So. Now that I have a nice reference table, I can quickly talk about the individual pieces.
The Lorien leaf was modelled by vertex-extruding the outline and filling the faces in-between. Then it was sculpted upon to get that central detail. And finally, the vine was created with the help of curves. Much easier and smoother than working with ordinary extrusion. There is a gossip going around that it has no pin at the back but don't believe everything you— Actually, that one is true. I didn't know how to model it and the references didn't really help.
The One Ring was the first I made because I thought it would be the easiest one. And it was. Just a simple ring with hand-sculpted engraving. The most difficult bit was to position the words correctly at the beginning so as not to run into problems later. Surprisingly, it worked.
Evenstar was my favourite piece, especially because I have one at home and I could get a good look at it. Online references are great but they have their limits. It was made in three stages. The wings were modelled and sculpted, the vine is again made via curves and the flower was array-modelled and sculpted onto. The last part was a pain because I had to choose between sculpting asymmetrically and doing retopology. I didn't want to do the latter, so I went with MultiRes—which meant I had to do each petal individually.
Vilya, Nenya and Narya went through a similar process. Vilya has no sculpted elements but I had to figure out how to make the gem and its socket. Not as straightforward as it might seem. Narya has its side sculpted, but it was slightly easier to make because of the Vilya experience. Nenya I was dreading the most. It's very bright in the reference photos, obscuring its design, so I had to spend a lot of time studying it. It also doesn't help that there are several design variations of all three rings. But I think I managed to model and sculpt Nenya as well as I could ever hope to.
So that sums up the modelling part. As for the texturing—it was mostly me figuring out how to generate good looking procedural maps. I always forget that I can actually *paint* in the software. I rely so much on the procedurals that when I can't get them to work, I'm stuck. Well, I'm happy to say that I remembered the artistic side of it at least once—for the Lorien leaf. The blend of dark and light green? Yup, that's all me, running around the place with a brush in hand. Didn't turn out half as bad as I expected.
What did turn out worse than expected, however, was the presentation. No, not the PowerPoint thing, the overall final result. So much work for such a mediocre render. Ugh. And you haven't seen what I was about to show you originally. This:

That's no good at all, is it, Precious? Do you know what the problem with that render is? Lighting. OK, how do we improve it? Erm, go through all HDRs you have and try if one of them works better? Nope, did that, this is the best I got. Hmm. Do a Blender render instead? Well, I almost went for that option. But I'll need to give you some context first.
I'm creating my own library of assets (I might have mentioned this before). But since this box was a part of the recent class, it lived in a different part of my computer than the library. I decided to fix that. In the middle of shuffling things around it dawned on me that the jewellery isn't getting enough light because the box is too deep. Maybe if I added a few pads it would look better. A quick test revealed that it would indeed work. It also led to a cascade of events that claimed my whole Sunday morning and early afternoon.
You see, I had a library file with meshes and textures for the jewellery box and I was linking it to the file for this week's project. "Adding a few pads" meant the following:
- Update the library file: create new meshes for the pads, UV unwrap them, and incorporate their UVs into an existing Texture Atlas set
- Export a new fbx file with the pads included
- In Substance Painter, re-bake maps for the affected texture set and apply the velvet material to new areas
- Export the updated textures from SP (overwrite the existing ones)
- Reload these textures in the library file. Fight with existing references and the fact that the old textures had been packed into the Blender file.
- Update the linked references in the project file. Realise that the lid you so carefully parented and constrained to rotate in a predictable way, loses all of this once it is linked as a group.
- Create a new fbx export for the project file (one that contains only references to the box and jewellery) and find out that for some reason, the lid is no longer visible in SP. It's not in the fbx even though it had worked before... Make five more fbx exports to figure out what's wrong. Give up and append the stupid lid because you can't be bothered anymore.
- Notice you didn't import your default camera with the latest fbx. Screw it, you are going to use the default one.
- Play for an hour with all the HDRs you tried the day before. Find three that give similar, but slightly different results, and spend ages trying to pick one of them. Choose one, make it into a final render, then stop the rendering before it's finished and go for a different option. Once it is rendered, add a depth of field. Close SP, look at the render, decide the blurring is too strong. Reopen SP only to find out that Iray now creates black rectangle that covers a third of your render. Restart everything couple of times until it randomly stops doing it.
- Close everything down knowing that after all this work you are still not satisfied with the final result and go look at funny parrot videos.
My Sunday in a nutshell.
Next week? I don't know. Something visually interesting, challenging, but fast enough to make so that I can finally put on my animation hat again. Nothing? I thought as much. But I'll figure something out. See you next time!


Comments
Post a Comment