Cute companion, part 1
Aaand I didn't win. Boo hoo.
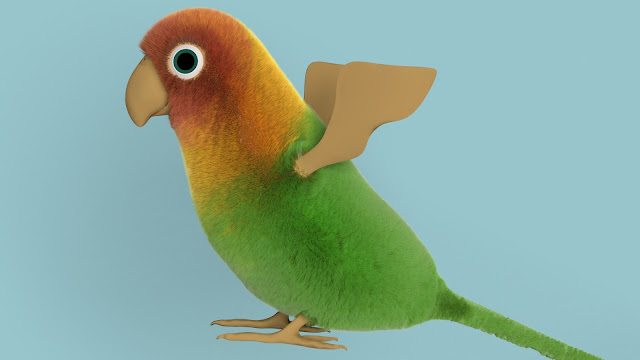
Well... time to make a cute companion, then. (That's the next topic, not a way of dealing with the heartbreak.) It took me a long time to come up with an original design—and my lack of drawing skills didn't make it any easier—but I somehow coughed up one. How well it turns out remains to be seen but at least I have something to start working on.
Well... time to make a cute companion, then. (That's the next topic, not a way of dealing with the heartbreak.) It took me a long time to come up with an original design—and my lack of drawing skills didn't make it any easier—but I somehow coughed up one. How well it turns out remains to be seen but at least I have something to start working on.
I don't want to bore you by repeating my usual creature-creating steps, so I'll try to pick one or two areas where I've made the biggest changes. The first one is retopology. I watched a few more tutorials on the topic and walked away with several tricks up my sleeve. I combined the shrinkwrap modifier with snapping to faces, which meant I didn't have to apply shrinkwrap until the very end.
I also used the Alt+B shortcut to limit the viewport visibility when I needed to work on body parts that would get messed up with the snapping on. There are many ways of limiting what you can see in the viewport, but this shortcut was new to me. And lastly, I used a bright green material for the low-poly mesh. A simple thing, I know, but it never occurred to me before. As a bonus, I didn't have to use the wireframe and xray mesh displays to see what I was doing. (They can be quite useful, but they also have a nasty habit of getting in the way.)
The second area I should mention is the hair particles system. Or systems, rather. And I should mention it, because I spent full two days tinkering with it and it still doesn't look quite as intended. I couldn't find many tutorials on furry animals, so I followed the one by Andrew Price. It gave me some insight into how to set up the particles but it unfortunately didn't solve the many problems I ran into.
The second area I should mention is the hair particles system. Or systems, rather. And I should mention it, because I spent full two days tinkering with it and it still doesn't look quite as intended. I couldn't find many tutorials on furry animals, so I followed the one by Andrew Price. It gave me some insight into how to set up the particles but it unfortunately didn't solve the many problems I ran into.
 |
| That was a one hell of a hairbrush |
For instance, when I tried to add hair in the particle edit mode, I found out that I couldn't. The issue went away when I moved the particle system modifier above the SubSurf—but then the hair were distributed differently and it was no good. Combing the hair proved even more challenging. Everything would look alright in the viewport, and then I'd end up with a render of a nastily plucked chicken. A number of Google searches revealed that, once again, the modifiers were to blame. It is fine and dandy to have different settings for View and Render on the SubSurf but woe to you if you keep that while you are working on hair particles.
In short, I tried to hold onto my modifiers for as long as I could, but even with the option "Use the modifier stack" on, the particle system kept producing weird results. So, I eventually applied both the mirror and SubSurf, and I can't wait to see what lovely issues that will cause further down the road.
Couple of paragraphs ago I mentioned particle "systems" in plural. That is because I figured out that a single system is not going to give me everything I needed. I might be able to trim the hair in the edit mode but I would still have serious issues when trying to dye it. So instead of one system I have five, tied to three different materials. I came up with this quite late in the creation process because I couldn't decide what colours I wanted to go for. In the end, I imitated the coloring of lovebirds.
Next week, I still have a little bit to do. I need to finish the texture painting on the beak and feet, find suitable alpha-masked feathers to use on the wings (or remove them completely), rig and pose the creature, and create the rest of the scene. Shouldn't be too hard, eh?


Fluffy boi
ReplyDelete