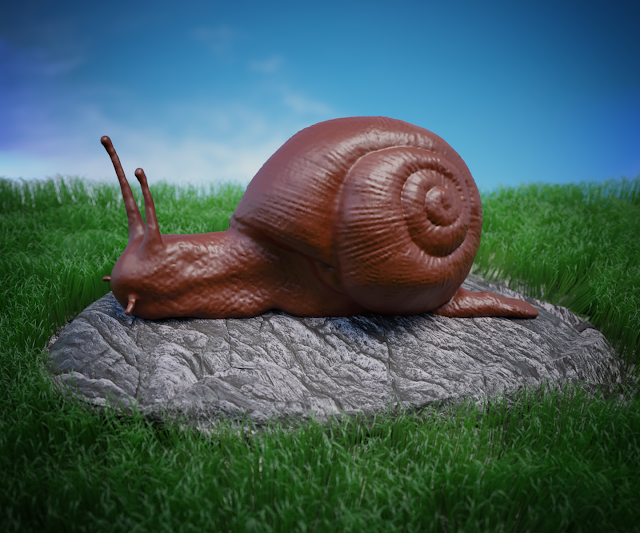
Mr. Snail
This week's project marks my first attempt at creating a realistic nature scene. Well, vaguely realistic. What I have planned is a sculpture of a snail sitting on a grass patch. At least I hope I will be able to make the grass—preferably a mesh grass, so that I can learn something new—but if I don't, I'll have to figure out something more simple.
The most important part is, of course, the snail. Looking at its shape and judging from experience, I think I'm going to have a hard time with the Skin modifier. It tends to misbehave when I use it on round shapes. Then I need to make sure I get the shell right—and I don't have a great track record in doing that. All in all, I don't have the slightest idea why I've chosen this scene, but here we go.
***
To save some time, I decided to focus on sculpting and to resume writing the blog once I'm finished. I did manage to do some in-progress renders at least, so you will find a short gif at the end. Hmm, what to say about the sculpting part? I committed two terrible crimes on the snail population. One, I only sculpted the part that is seen on camera, and two, I flipped the poor guy horizontally. For some reason, I prefer the creatures looking left when I sculpt them, so I changed the reference picture to suit me. Which unfortunately means that the spiral of the shell is on the wrong side. Please don't tell the snailologists. They'd be furious, I'm sure. (But I still like it better this way.)
Sculpting the shell was as difficult as always, because I never learn. I have this silly notion that if I create the shape and then just cut in the crease, it will work. It never does. Because you have to do it from all sides—and I'm just not very good at that. But one thing that doesn't cease to amaze me is that a project can look like a potato for the longest time, and then, when you are almost ready to give up, it magically starts looking like the thing you wanted to make. And the best you can do at that point is to carry on quickly, before it returns to its potato state.
Now, with the pattern of the shell and the body, I knew I wouldn't be able to create the detail by hand. And if I tried it would've looked ridiculous. So I brushed up on my knowledge of texture-aided sculpting and I cut out two small pieces of the reference image to serve as my textures. I then spent a considerable amount of time trying to figure out how to best apply them on the snail. In the end, I used the inflate brush with line stroke for the shell, and air brush stroke for the body. Unfortunately, applying the texture also distorted the sculpture beneath (because of the inflate brush part). Especially the shell got more bumpy than it originally was. But smoothing it was out of question (it would erase the texture) so I tried to fix the worst parts with the grab brush (with little luck).
On the body I experimented with stencil. I believe it's a technique commonly used in regular sculpting. You take a piece of fabric and press it into the wet clay, creating a nice pattern. Well, it works similarly here, only you have to brush over a see-through representation of the texture. Which stays clipped to the sculpting panel, for some reason, so you have to find creative ways of rotating the sculpture to shove it beneath it. But all that hard work rewards you with details you would be hard-pressed to get otherwise. ("Hard-pressed", hee, hee. Sorry.)
***
With the snail done, I turned my attention to the grass. I still remembered the tutorial a bit, but there are so many setting in the particle system that I decided to take no chances and follow the tutorial closely again. It will be some time before I can do it all by heart. I also improved the grass material by using the Hair BSDF shader, color ramp and a Hair Info node. The last one is supposed to darken the roots and lighten the tips (not that I can see it very well, but let's hope it works correctly).
For the rock I used a texture from an old Blender Guru's tutorial, and I scaled it way down since it is originally meant for a cliff. I changed the color a bit but then I wasn't sure what else to do with it so I kept it as it was. I'm not convinced it fits the scene, though. I'd have preferred to put Mr. Snail on a mushroom, but there was no time for that.
Finally, I played a lot with post-processing. I used filmic color management again, with medium high contrast (that's the option I seem to prefer the most), I added a vignette (rather strong this time—but I like the dramatic look above all the other ones I tried) and I did some color correction, too. Oh, and I focused the view on the snail, so the rest of the scene is slightly blurred. All in all, I think it turned out rather nicely. There are still plenty of things I'd improve if I could (and knew how) but they'll have to stay and be fixed in the future scenes.
Next time I should be able to do a bigger scene again. The Real LifeTM seemed to be satisfied with my cooperation and gracefully allowed me to play with Blender once more.


Comments
Post a Comment