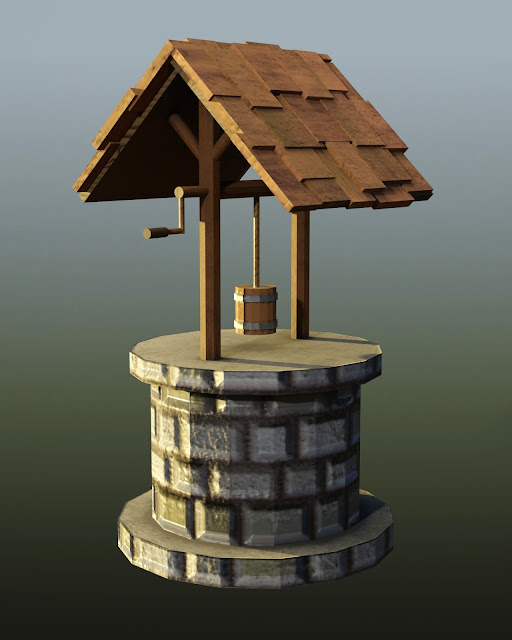
Primitive well
Another week gone and a few more CG steps made. And what exactly have I made? Well...
Yes, well. The actual... you know. Round thing, typically used for getting water and saving lost children from. Although, apparently, there has never been a Lassie episode where Timmy had fallen in it. Which is just as well because my well doesn't have a hole. This is getting stranger by the minute, isn't it?
There is an actual reason for it: it's a primitive well. That is, a well made of primitive shapes. And I've used it as a homework submission for the first part of "Mesh Modelling Bootcamp" at CG Cookie. Now, I originally thought (in my grandiose self-delusion) that I'd do a whole detailed primitive village. Then I sobered up and made just the well. And to spice things up a bit I also textured it—in Substance Painter, of course. All the loose ends are tied up now, so we can have an actual look at the beauty.
Or at... that. I feel I'm getting slightly better at texturing (granted that I've been using the program for little under two weeks) but there are still miles and miles ahead of me before I can call myself "Substance Painter-proficient" at ArtStation. The good thing is that I'm stubborn enough to walk that distance. The bad thing is that I often take detours.
For instance, I spent two days playing with every conceivable baking option in Blender and Substance. I found several working solutions (each with their own drawbacks) but in the end I decided to stick to this one:
- Create a model in Blender ("object") and give it a default empty material in Cycles
- UV unwrap all mesh parts
- Create two duplicates: "object_low" and "object_high"
- Delete and/or apply modifiers on both objects (in line with low/high-res intentions)
- Join meshes that will fit into single UV space (separately for "object_low" and "object_high")
- Switch to Blender Internal, create solid-coloured materials and assign them to selected mesh areas of "object_high".
- Export two .fbx files: one with only low-res object selected, the other with the high-res object
- In Substance, use the high-res object to bake normals and ID mask
- In "ID" baking parameters, choose the option "Material colour"
There are a few notes I need to make here:
- I found out that the materials need to be assigned in Blender Render to produce the ID mask using "Material colour" option. If Cycles is used, that option doesn't work (but it is possible to choose "Mesh ID / Polygroup").
- No matter which approach I use to bake the ID mask, the result always has jagged edges. Enabling anti-aliasing is not a good idea. The ID mask looks better, but will eventually cause more harm than good. The AA creates different colours around the edges and those pixels will drop out of the masked selection. To get rid of the jaggedness, it is best to add "Blur" filter and "Levels" to the colour selection mask.
- The reason I'm trying to bake the ID mask in the first place is that it will let me create different looking materials within the same material "container" in Substance. This approach should also be more memory-efficient if I ever wanted to use that asset in a game.
Now, do you know what's the funniest bit? In the end, I didn't bake the ID map at all. In one of the (many) tutorials I watched this week I was shown a different way of assigning material parts: UV island selection. That turned out to be more fitting in my case, because I wanted to practice making a lot of different-looking parts. But I'm not going to abandon the ID mask concept completely. It will still come in handy when I have several mesh parts that need to use the exact same material.
As usual, this post is getting more long-winded than I anticipated, so I'll rush the ending a little bit. Here is a render of the well without materials
and here is a side-by-side comparison of a Blender render and Iray render.
There was a painfully long period of time where I tried everything I could to render the Iray version with good-looking background, but it just didn't happen. There are currently two options: realistic HDR environment (which makes the well stand out like a sore thumb) or solid colour. In the Viewport, it is possible to blur the HDR environment, but for some reason, the renderer ignores those settings and disables the blur. I learnt today that the current UI is quite fresh, so there is still hope they will enable the option in a future release.
And with that I'm going to leave you now. Too many tutorials to watch. (I think I'll get some for Substance Designer, too, when I'm at it. Maybe there'll be just materials created next week, who knows.)


Comments
Post a Comment