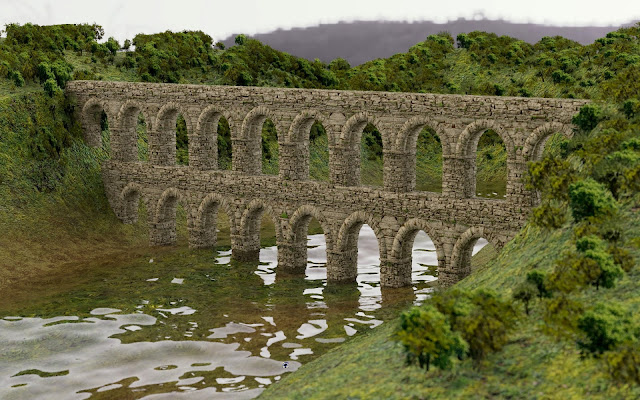
Roman aqueduct
Well, that was a longer pause than I had expected. I was... delayed.
Since I couldn't work on the aqueduct scene (hospitals are not the most accommodating environments for an aspiring CG artist), I didn't manage to finish it before the deadline expired. Once I returned home I thought I would start working on the next scene right away, but then it gnawed on me so much that I decided to push the aqueduct scene into some sort of final state. It is far from perfect and there is a number of things I wanted to make and couldn't, but it will have to do.
The parts I originally completed were the aqueduct itself and the ground texture. The aqueduct was relatively simple to model (all hail the array modifier) but it was a beast to texture. I quickly became aware that if I UV unwrapped it as a whole, the texture would be visibly repeated. So I went through the trouble of individually re-touching every part of an arch, column and connecting section, so that not two of them were mapped to the same part of the texture. It was one hell of a work, but I couldn't have done it without the UV Magic add-on that allowed me to copy UV coordinates from a selected section to another one.
With the aqueduct provisionally completed (I intended to batter it down later), I focused on the ground. I cobbled together a couple of landscape meshes, downloaded a decent grass and mud texture, and spent ages on trying to fit them together. I've done that before but I never tried to make it work with two distinct microdisplacements. Until now. And I'm happy to report that I made it work.
The two materials are represented by groups ("Grass Hill" and "RiverBank") and their scope is defined by the black-and-white Map texture that I drew. That much I figured out in my previous projects. The trick with displacement was to use a MixRGB node, combine the two values and use the same Map texture as a factor. I didn't really expect it to work, but the test renders indicate that it does.
Now came the part that I completed after my return (and I somehow managed to do it in about 2 hours). For the river I used the Ocean modifier, combined with a simple Glass material that has IOR of 1.333. It worked better than I had expected, even though I should have studied the modifier in greater depth to get a more realistic result (the waves should be smaller, I think).
For the trees I downloaded several backdrop images and imported them as planes into the scene. Then I set up a particle system (I'm getting more comfortable with them as time goes by) and I used it to distribute the trees in the scene (their density is limited by a vertex group). Without texture the scene looks like this:
I would have spent a lot of time tweaking the trees to make them feel less clumped, but, given the circumstances, I thought it was good enough.
I lighted the scene with an HDRI (at one point I tried using two images, as demonstrated by Gleb Alexandrov in his Lighting tutorials) but it wasn't working for me in this scene. In the end I just slightly tinted the colour and used depth of field to blur out the background. In the post-processing phase I made minor adjustments to RGB curves, value and saturation, and I also fixed the levels. This scene had the best balanced levels so far, so I didn't have to slide them too much. I guess that's a good thing? Maybe?
With my next project I wanted to participate in another CG Challenge (Mythical creature should be right down my alley of "expertise") but in the end I decided to go for Blender Guru's Christmas competition instead. That is because I made a fantasy creature recently, and as enjoyable as it was, I'd like a bit of change. I'm already working on the scene—and since I can trust you not to spoil the secret, I will tell you that it involves larger than small amount of baking. But shhh! Don't tell anyone!


Comments
Post a Comment